
Now we're going to peek at part of one of the six "Basic Step" lessons in the NYIAD Course. This is Basic Step Three: How to Plan Your Furniture Layout. Students receive this lesson at the mid-point in their NYIAD training as part of Unit Three.
This excerpt is exactly as it appears in the illustrated text. In the same Unit, the student will also watch professional interior decorators plan different furniture layouts on videotape, as well listen to a discussion on audio tape between the Director and Dean of the school on the same subject.
The "Basic Step" series gives NYIAD students the skills to perform the basic work to plan the design for any room. "Step One" is sketching a room, and "Step Two" is drawing a finished floor plan. After "Step Three," which is excerpted here, the final steps are: Four - creating a lighting plan for the room, Five - giving the room harmony, and Six - creating the final presentation.
You are about to embark on one of the most pleasurable steps in the whole design process - planning a furniture layout. As you recall, you already drew a finished floorplan of the Redford living room. In this lesson you will learn how to decide upon a furniture plan and draw it on that finished floorplan.
Since the floorplan you drew earlier is in 1/4" scale, you will want to draw your furniture plan to the same scale too. Don't worry, you don't have to be an artist to draw a furniture plan. All you need is to be neat. The NYIAD Furniture Template, which you will find in your Furniture Plan Kit, does the drawing for you.
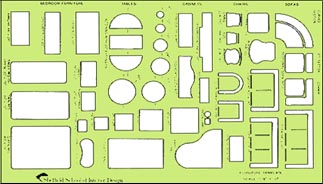
On this template are cutouts in 1/4" scale representing the principal types of furniture, as shown in Figure 1. To make your furniture plan, you simply trace the outline of the appropriate cutouts onto your floorplan. In doing this lesson you have a choice. You can draw your furniture layouts on Xerox copies of the finished floorplan you drew, or you can use the printed copies of that floorplan that are in your Furniture Plan Kit.
How do you start?
You start by "having a conversation" with the room. You are going to "talk" to the room, and you'll be amazed at how many answers it will give you. What do we mean by this? Simply, that you will look at the floorplan and ask certain fundamental questions, and you're going to get the answers from what you see - from the walls...the door openings...the windows...the fireplace. The room itself will "answer" all your questions!
While of this may sound mysterious at this point, once you know the right questions to ask, the mystery will disappear. In its place you will have a simple, easy-to-follow technique to use whenever you design the furniture layout for any room. Any room! In this lesson you're going to learn how to ask the "right questions."
The Right Questions
Basically, you are going to ask four questions:
- 1. Where are the balance lines of this room?
- 2. What are the traffic patterns of this room?
- 3. What is the focus of this room?
- 4. How can I establish the axis of this room?
Once the room has given you the answers to these four questions, and you have designed the basic furniture layout, you will refer to that furniture layout to answer two more questions:
- 5. Is there any space left in the room in which to plan for secondary activities?
- 6. Does the furniture layout pass the Balance Test?
Using the floorplan of the Redford living room, let's examine each of these questions in detail.
Question One: Where are the balance lines of this room?
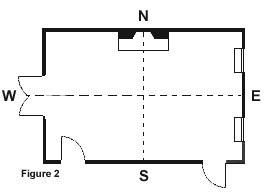
This is the easiest of all the questions. Take out a scale drawing of the finished floorplan, class it on your drawing board, and very lightly draw a pair of lines that cut each wall in half, as in Figure 2. These lines are the balance lines of the room, and they divide the room into four equal-sized areas.
We call each of these four areas a quadrant of the room. "Quadrant" simply means one-quarter. You will use the balance lines as the midpoints around which you organize furniture to achieve a "balanced" look in the room.
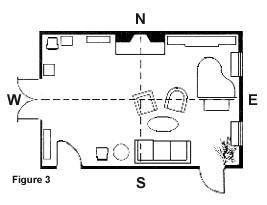
Very simply stated, a room is in balance when the "weight" of the furniture on one side of the room is about the same as the weight of the furniture on the opposite side. For example, in Figure 3 you see a furniture layout that is clearly out of balance - there's much more furniture on one side of the balance lines than on the other.
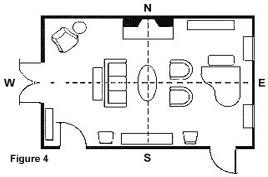
In Figure 4 you see a furniture layout that is in balance - there's just about the same weight of furniture on both sides of the balance lines.
From these illustrations you get an idea of how you will use balance lines to help you evaluate the relative weight of furniture groupings in different parts of a room. Later in this lesson you will learn how to use these lines to organize your furniture layouts.
For now, just be aware of the meaning of balance lines. Later in this lesson you'll learn how to use the four quadrants to subject the room to a "Balance Test."
Question Two: Where are the Traffic Patterns in this room?
You are asking, in effect: Where can I not place any furniture because it will be in the way of the natural flow of people as they move about the room? To answer, you must consider doors, windows, fireplaces, and heating/cooling units. Let's look at how to handle each of these:
Doors. Leave 36 inches clear in front of each door opening. In addition, if a door swings into the room, allow space for the swing of the door.
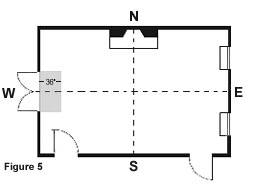
Let's begin with the doors on the West wall - a double-door arrangement that leads into the dining room. Clearly, you can't put any furniture directly in front of this door opening. You've got to leave a clear space of 36 inches in front, as shown in Figure 5. So, the room has spoken to you. It has told you: No furniture goes here!
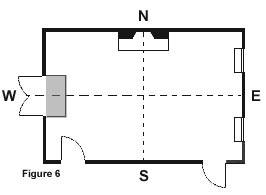
On your floorplan, lightly draw in the traffic pattern for this double door. Use diagonal lines to define this area, as in Figure 6.
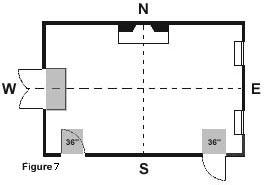
Turn next to the South wall, and ask it the same question: What can it tell you about the traffic patterns in the room? The South wall features a door at either end. It tells you that you can't place any furniture directly in front of these doors, as shown in Figure 7. Again, leave 36 inches clear.
Allowing For Door Swing. Notice something special about the door at the west end of this wall. It swings into the living room and would hit any furniture in its path. In this case, the question you have "asked" the door on the South wall has influenced your furniture layout along the West wall, toward which the door swings. The point is, when a door is near a corner, it can influence the furniture placement on the adjoining wall as well.
Draw in the traffic patterns for the South wall. Your drawing should now look like Figure 8.
Let's move on with your "conversation" with the room.
You've covered the two walls that have doors, so we've covered the space we have to leave for the Traffic pattern for doors in this room. What about the other two walls? They don't contain any doors, but they have other architectural features that can influence the traffic patterns in the room? What are these features? Let's ask the room again...
We've shown you just the beginning of the in-depth study that must be given to how a potential furniture layout works in for a room. In addition to analyzing the North and East walls of the Radford living room and establishing traffic patterns for windows and the fireplace, the lesson goes on to establish the room's focus and build a series of possible layouts. In addition to the physical characteristics of the room and the plans of the people for whom you are designing the room, "Step Three: Furniture Layout" covers other issues that must be considered.


